


A couple of months ago I purchased a few WiFi Smart Switches with the intention of making my home a bit smarter and a somewhat automated. Months have passed and my home didn’t become any smarter, nor was automation in sight, with the exception of an automated 3-hour programme of my washing machine. And it was like that until now.
I finally got some spare time, dusted off the smart switches and decided that I am going to put them to use. An idea prompted in my head: I could set up several appliances in my home with these smart switches and, beside the fact that I could operate them from anywhere remotely, I can also track the consumption of electricity and the cost for every working session of each of them, as well as calculate the total cost and consumption for a particular time frame (i.e. week, month or year).
In the following text, I’ll describe from start to finish, how I made this weekend project from scratch in Django and by using Tuya IoT Platform Cloud APIs in order to connect Django with my smart switches. Also, the entire code will be available at my GitHub repository if you decide you want to use it (or possibly improve the application I’ve created).
So let’s get started:
1. Prerequisites
Before we move on to the coding aspect of the project, there are a few prerequisite actions that should be done. This part is a bit longer, but it is necessary to do it right in order for the project to work properly.
In the first place, you’ll need to register a Tuya IoT Platform account in order to access the cloud APIs that are required for this project to work. You can create an account on this link.
After you have created the account and logged in the platform, navigate to Cloud on the left sidebar navigation. Once you are there, the next step is to Create a Cloud project.
To create a cloud project, press on the blue button with the same name (Create Cloud Project) and fill up the form in the popup. IMPORTANT note here: When providing the information in the form, be sure to pick the correct Data Center in the last field. For example, if you are located in Central Europe, you need to pick the Central Europe Data Center option in the field.
After you click Create in the popup, you should Authorize API services in the next step. Basically, you’ll need to pick which Tuya Cloud APIs you need for your project. The initial IoT Core and Authorization APIs will be sufficient for this particular project, but you can always change this and add more to the Cloud Project later.
Good. Now you have created a Cloud Project and it is time to set up the proper settings for it. This process should be followed as described below:
a) Add User

In your Cloud Project, click on the Users tab and click the Add User button. You can choose between using a mobile phone number or an email address for this user. There can be multiple users, and you can use the same credentials as for the main account of this platform. Note that the user details provided in this step here will serve as the user for this Cloud Project and not for the platform itself.
b) Authorize the User

Once you have created the user, click on the Assets tab and then on the Authorized Users inner tab. Next, click on the Add Authorization button and insert the credentials you used in the previous step.
c) Add Asset

Assets are tree topological structures used to indicate the location of devices. Devices belong to assets. In actual projects, each asset indicates an actual physical space, such as an office building, an agricultural shed, or a truck. Actual devices belong to assets for easy management. While in the same Assets tab, on the left side you will find the Add Asset button. Click on it and insert an Asset Name.
d) Add Device

Once you created an asset, click on Devices inner tab (the tab on the left side of Authorized Users). Next, click on Add Device and from the dropdown, pick Add Devices with IoT Management App (this is a mobile application). A popup with a QR code will appear. You can search for the mobile application manually in the Play Store or you can scan the QR code for a link to the app.
The IoT Management App is an application which is necessary (for this project) for connecting the smart switches (and other smart devices) in your home and a Django application though Tuya Cloud APIs.
After you have installed the app, open it and in the first field you can click on the square icon in order to scan the created Cloud Project and connect it with the app. For the account and password, use the same credentials that you provided in step a) (Add User).
Once you are logged in the Cloud Project, you can click on All Devices and the Asset you have created previously should be visible. Select it and click on the Add Device action. After that, you can either manually pick the device (in my case, a smart switch) or you can go to the Auto Scan tab. Note that if you are going for the Auto Scan (that’s how I prefer to connect my devices), your mobile phone needs to be connected to the same WiFi which will be used for the devices, and you will need to restart the devices/smart switches in order to appear on the screen.
After the device(s) appear(s), click next and on the next screen you will see your router name and you’ll need to enter the password, so the device(s) can connect to the WiFi. When this is completed successfully, you will see the added device(s) list on the main screen.
With this step, setting up the Cloud Project and device connection is done, now we’ll move on to the next part.
2. The Code - Devices

For this part, I’ll consider that you’ll have the basic understanding on how to set up a Django project, so I won’t get into the details here on how to do it.
With that said, let’s continue with creating the first Django app: Devices.
python manage.py startapp devices
Tuya Cloud API connection config
Once you have created the ‘devices’ app, create a file named env.py and inside you will need to include the details needed to connect this Django project to the Tuya Cloud APIs. To do that, paste this code inside the env.py file:
ACCESS_ID = "<Insert your Tuya Cloud ACCESS_ID here>"
ACCESS_KEY = "<Insert your Tuya Cloud ACCESS_KEY here>"
API_ENDPOINT = "https://openapi.tuyaeu.com"  # note EU after tuya
MQ_ENDPOINT = "wss://mqe.tuyaeu.com:8285/"  # note EU after tuya
You will find ACCESS_ID and ACCESS_KEY in the Overview tab of the project you have created in the Tuya Iot Platform under Authorization Key (Access Secret/Client Secret is actually the ACCESS_KEY).

For API_ENDPOINT and MQ_ENDPOINT, note the EU in tuyaeu.com link. This should be modified to the appropriate abbreviation of the Data Center you have picked in the creation of the Cloud Project.
Setting the Routes
Next, inside the ‘devices’ app folder provide urls.py with the following routes:
from django.urls import path

from . import views

urlpatterns = [
    path('devices/', views.devices, name="devices"),
    path('power/<device_id>', views.power_device, name="power_device"),
    path('monitor/<device_id>', views.monitor_device, name="monitor_device"),
]
Don’t forget to include ‘devices’ app into your settings.py file and into the urls.py of your main project’s folder.
Setting the Models
For the models.py inside the ‘devices’ app, I have used the following models:
from django.conf import settings
from django.db import models
from datetime import datetime
from django.conf.urls.static import static
from django.urls import reverse


class Device(models.Model):
    name = models.CharField(max_length=150)
    device_id = models.CharField(max_length=150)
    status = models.BooleanField(default=False)
    watts = models.IntegerField(null=True)
    monitoring = models.BooleanField(default=False)
    powered_on = models.DateTimeField(blank=True, null=True)
    powered_off = models.DateTimeField(blank=True, null=True)
    created = models.DateTimeField(auto_now_add=True, blank=True, null=True)

    def __str__(self):
        return self.name

class DeviceLog(models.Model):
    device = models.ForeignKey(Device, on_delete=models.CASCADE, related_name="device")
    powered_on = models.DateTimeField(blank=True, null=True)
    powered_off = models.DateTimeField(blank=True, null=True)
    consumption = models.FloatField(blank=True, null=True)
    cost = models.FloatField(blank=True, null=True)
The model Device is the model where all needed information that is fetched through the API call is stored, plus additional fields that are needed for the project’s calculations which will be explained with the logics in views.py
The model DeviceLog is the model where the details for device usage sessions are stored. Based on the data in this model for each device log entry, the total electricity consumption and cost are summed up and represented in the project’s dashboard.
The Forms
For the Devices view, only one form will be needed. In order to set up the form, create forms.py into your ‘devices’ app folder and add the following form:
from django.db import models
from .models import *
from django import forms

class setWattsForm(forms.Form):
    watts = forms.IntegerField(widget=forms.NumberInput(attrs={'placeholder': 'Insert device Watts'}))
The View
At first, at the top of the view.py file inside the ‘devices’ folder, import the following packages:
from django.shortcuts import render, get_object_or_404, redirect
from datetime import datetime, date
from .models import *
from settings.models import *
Basically, here you import render, get_object_or_404, redirect, datetime and date. These packages will be required for the upcoming functions in this view. Additionally, here you import the models for the Devices app that you have created before and the models from the Settings app which will be created shortly.
Making a connection to Tuya Cloud APIs
As a prerequisite for this step, you will need to install a package named tuya_connector. To do that, in the console use the command
pip install tuya-connector-python
Now, for the connection to Tuya Cloud APIs inside the view, first you'll import the logging package.
import logging
Next, you’ll need to import the variables from the env.py config file that you created before. Also, from the installed tuya connector package, you need to import TuyaOpenAPI and TUYA_LOGGER. You can do both of these requirements in the following way:
from .env import ACCESS_ID, ACCESS_KEY, API_ENDPOINT
from tuya_connector import TuyaOpenAPI, TUYA_LOGGER
Optionally, to use the logger in order to debug the connection to APIs in the console, you can add the following line to the view.py file
TUYA_LOGGER.setLevel(logging.DEBUG)
Now, to make a connection to Tuya Cloud APIs insert these two lines:
openapi = TuyaOpenAPI(API_ENDPOINT, ACCESS_ID, ACCESS_KEY)
openapi.connect()
The first line provides the parameters required for the connection, while assigning them to the ‘openapi’ variable, and the second line is making the actual connection. Now, since you have set the connection, you can use the ‘openapi’ variable to make requests to particular API endpoints and fetch results. You will see that in practice shortly.
So far, the code in views.py should look like this:
from django.shortcuts import render, get_object_or_404, redirect
from datetime import datetime, date
from .models import *
from settings.models import *

from .forms import *

# Import Logging
import logging

# Import connection configuration (.env file) & import TuyaOpenAPI and Logger
from .env import ACCESS_ID, ACCESS_KEY, API_ENDPOINT
from tuya_connector import TuyaOpenAPI, TUYA_LOGGER

# Uncomment this if you want to Debug Tuya Cloud Functions
#TUYA_LOGGER.setLevel(logging.DEBUG)

# Connect to TuyaOpenAPI
openapi = TuyaOpenAPI(API_ENDPOINT, ACCESS_ID, ACCESS_KEY)
openapi.connect()
Next, you will need to include the following functions inside views.py file:
1. Refresh Devices function
# Refresh Devices
def refresh_devices(request):
    # Fetch all available Devices
    all_devices = openapi.get("/v1.2/iot-03/devices")
    all_devices = all_devices['result']['list']

    # Loop through all fetched devices and save/update them in the database
    for device in all_devices:
        device_id = device['id']
        name = device['name']

        # Check the Cloud state of the device
        dev = openapi.get('/v1.0/iot-03/devices/{}/status'.format(device_id))
        state = dev['result'][0]['value']

        obj, created = Device.objects.update_or_create(
            device_id=device_id, defaults={'name': name, 'status':state}
This function will be included in the ‘devices’ function, through which all devices that you may have added through the IoT Device Management App will be fetched from an API endpoint and rendered inside the ‘devices’ template on each reloading of the template, so that you have the most recent status for every device. The information fetched from the request will be stored in the database.
From there you will be able to include (or exclude) any of the available devices for monitoring in this Django project.
Basically, any included device for monitoring will be rendered in the Dashboard template and will be available for controlling and logging its activity sessions.
Basically, this function is fetching all available devices via making the request to ‘/v1.2/iot-03/devices’ endpoint and assigning it to the ‘all_devices’ variable with this command.
all_devices = openapi.get(“/v1.2/iot-03/devices”)
To find more detailed information on the endpoints and IoT Core-Cloud Services API references, you can visit the Tuya’s Cloud documentation on the following link:
2. Powering a Device and making a Device Log entry
def power_device(request, device_id):
    today = datetime.now()
    # Get a device
    device = get_object_or_404(Device, device_id=device_id)

    # Check if device is powered on/off
    if device.status:
        commands = {'commands': [{'code': 'switch_1', 'value': False}]}
        device.status = False
        device.save()

        # Update Powered Off time in Device model
        obj, created = Device.objects.update_or_create(
            device_id=device_id, defaults={'powered_off': today}
        )

        # Calculate consumption
        started = device.powered_on
        ended = today

        # difference between the start and the end of an activity in seconds
        dur = ended - started
        duration = dur.total_seconds()

        # convert duration to hours
        hours = duration / 3600

        # calculate device kilowatts
        kilowatts = device.watts / 1000

        # calculate kilowatt-hours
        kwh = hours * kilowatts

        # calculate the activity session cost
        price = Price.objects.last()
        kwh_price = price.kwh_price
        cost = kwh * kwh_price

        # Create DeviceLog entry with each active session of a device
        DeviceLog.objects.create(device_id=device.id, powered_on=device.powered_on, powered_off=today, consumption=kwh, cost=cost)

    else:
        commands = {'commands': [{'code': 'switch_1', 'value': True}]}
        device.status = True
        device.save()

        # Update Powered On time in Device model
        obj, created = Device.objects.update_or_create(
            device_id=device_id, defaults={'powered_on': today}
        )


    # Send the commands for powering on/off
    openapi.post('/v1.0/iot-03/devices/{}/commands'.format(device_id), commands)

    return redirect(request.META['HTTP_REFERER'])
In this function, there are two things going on simultaneously:
The first one is sending commands to ‘v1.0/iot-03/devices/{}/commands‘ endpoint (openapi.post(“/v1.0/iot-03/devices/{}/commands”)) in order to Turn On or Off a particular device. The logic behind this action is to check initially for the Status state of the device in the database entry created when all devices were fetched, and if the Status is True. That means that the device is Turned On, and this function will change the device Status to False and it will send a request with a command for the device to be Turned Off.
The second thing is that this function is making a Device Log entry for the activity session of a device. With that, it will calculate the duration between the start and the end of an activity session for this device, and based on that it will calculate the consumption of electricity and the cost for this particular session. The Device log entry is saved to the database through the DeviceLog model and it will be visible in a table in the Dashboard template.
3. Devices function and setting Watts for a Device
def devices(request):
    refresh_devices(request)

    devices = Device.objects.all()

    form = setWattsForm()
    if request.method == 'POST':

        form = setWattsForm(request.POST)

        if form.is_valid():
            device_id = request.POST.get('device_id')
            watts = form.cleaned_data['watts']
            monitoring = True

            Device.objects.filter(device_id=device_id).update_or_create(device_id=device_id, defaults={'watts': watts, 'monitoring': monitoring})


            return redirect('devices')

        else:
            print('Not valid')


    context = {
        'devices': devices,
        'form': form
    }

    return render(request, 'devices.html', context)
This function will call the ‘refresh_devices’ function in order to get the latest information and status for every device that was added in the IoT Device Management App. Also, it contains the logic behind the form through which the power unit, or Watts, will be set or updated for the device that is being selected for monitoring. Power (Watts) are important for the calculation of kilowatt-hours, and therefore the electricity consumption cost.
4. Device Monitoring
def monitor_device(request, device_id):
    # Get a device
    device = get_object_or_404(Device, device_id=device_id)

    # Remove device from monitoring state
    if device.monitoring:
        device.monitoring = False
        device.save()

    # Add device for monitoring
    else:
        device.monitoring = True
        device.save()

    return redirect(request.META['HTTP_REFERER'])
This is a short function and it is responsible for setting the monitoring status of a device. It will check if a device is already monitoring and if it is the case, it will give an option to a user to remove a device from being monitored, and in an opposite scenario – if a device is not monitored, through this function it can be added for monitoring and made available for operation in the Dashboard template.
3. The Code - Settings

Next Django app to be created is Settings. As you already know, the command for doing that is:
python manage.py startapp settings
Settings will serve as a place where you can set the default values for the Currency and Price per kilowatt-hour (which is set by your electric utility). Although there might be two (or more) different billing tariffs for electricity consumption, currently this project is set with one value only for the sake of simplicity. In some future updates I will make it to support multiple values for this matter.
Setting the Routes
Next, inside the ‘settings’ app folder provide urls.py with the following routes:
from django.urls import path

from . import views

urlpatterns = [
    path('settings/', views.settings, name="settings"),
]
Don’t forget to include the ‘settings’ app into your settings.py file and into the urls.py of your main project’s folder.
Setting the Models
For the models.py inside the settings app, I have used the following model:
from django.conf import settings
from django.db import models
from datetime import datetime
from django.urls import reverse

class Price(models.Model):
    kwh_price = models.FloatField()
    currency_name = models.CharField(max_length=150)
    currency_abbr = models.CharField(max_length=150)
    updated = models.DateTimeField(auto_now_add=True, blank=True, null=True)

    def __str__(self):
        return self.currency_name
The model Price stores the price per kilowatt-hour (kwh_price), the name of the currency (currency_name), the currency abbreviation (currency_abbr) where you can use an abbreviation or a symbol for a particular currency, and when this model was updated (updated). Note that the currency abbreviation or symbol will affect the rendering of pricing in templates, so long abbreviations might mess up a bit of the template’s CSS.
The Forms
For the Settings view, only one model form will be needed. In order to set up the form, create forms.py into your ‘settings’ app folder and add the following model form:
from django.db import models
from .models import *
from django import forms

class setPriceCurrencyForm(forms.ModelForm):
    kwh_price = forms.FloatField(widget=forms.NumberInput(attrs={'placeholder': 'Insert price'}))
    currency_name = forms.CharField(widget=forms.TextInput(attrs={'placeholder': 'Insert currency name'}))
    currency_abbr = forms.CharField(widget=forms.TextInput(attrs={'placeholder': 'Insert abbreviation or symbol'}))

    class Meta:
        model = Price
        fields = ("kwh_price", "currency_name", "currency_abbr" )

        def __init__(self, *args, **kwargs):
            super(setPriceCurrencyForm, self).__init__(*args, **kwargs)
The View
At first, at the top of the view.py file inside the ‘devices’ folder, import the following packages:
from django.shortcuts import render, get_object_or_404, redirect
from datetime import datetime, date
from devices.models import *
from .models import *
from .forms import *
In the same way as previously in the ‘devices’ view, here you import render, get_object_or_404, redirect, datetime and date. These packages will be required for the upcoming functions in this view. Additionally, here you import the models for the Devices app that you have created before and the models from the Settings app which will be created shortly. Also, here you import the form that was created in the previous step.
Next, you will need to create the ‘settings’ function:
def settings(request):

    price = Price.objects.last()

    form = setPriceCurrencyForm(instance=price)
    if request.method == 'POST':

        form = setPriceCurrencyForm(request.POST, instance=price)

        if form.is_valid():
            form.save()

            return redirect('settings')

    context = {
        'form': form,
    }

    return render(request, 'settings.html', context)
There isn’t anything complex here. Basically, this function sets up the logic behind the form for setting up the kWh price and Currency values. However, these are important for the electricity consumption cost calculation that’s happening in the ‘devices’ view, as you have seen above.
4. The Code - Dashboard

The last Django app to be created is Dashboard.
python manage.py startapp dashboard
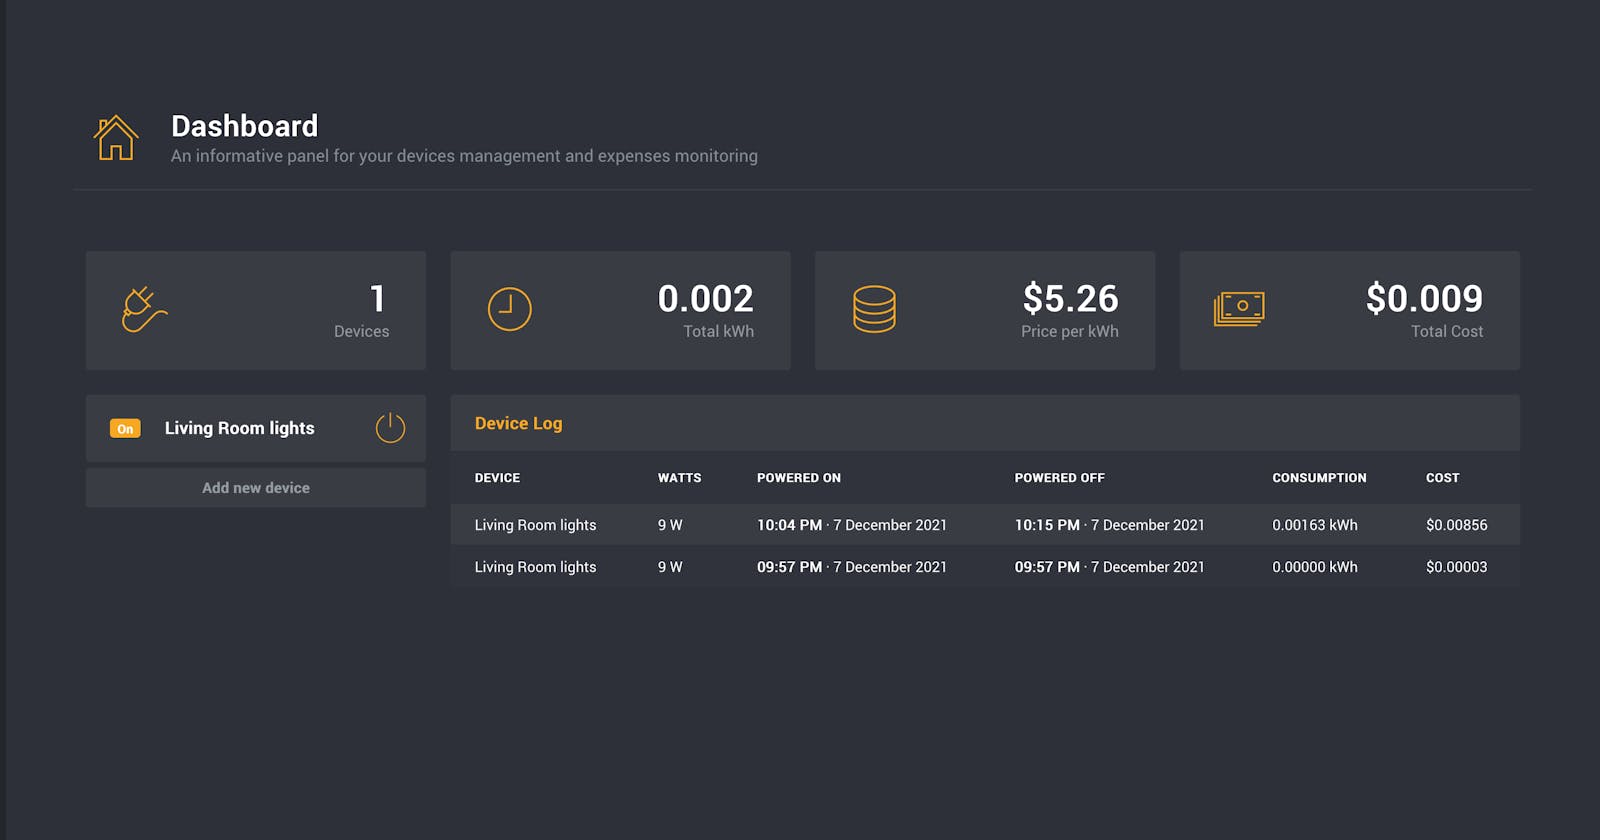
Through Dashboard, you will be able to control the devices which were added for monitoring and to see the Device Log and the Total Cost of electricity consumption for all of the monitored devices. In some future update, I will improve the dashboard by including charts in order to visualize the tracking and make it more beautiful, with more details and stuff.
Setting the Routes
Next, Inside the dashboard app folder provide urls.py with the following routes:
from django.urls import path

from . import views

urlpatterns = [
    path('', views.dashboard, name="dashboard"),
]
Setting the Models
There is no need for any additional models in the Dashboard app because the ‘dashboard’ view will use the already existing models from the Devices and Settings apps.
The View
At first, at the top of the view.py file inside ‘devices’ folder, import the following packages:
from django.shortcuts import render
from datetime import datetime, date
from devices.models import *
from settings.models import *

from django.db.models import Sum

from devices.views import refresh_devices
In the same way as previously in the ‘devices’ view, here you import render, datetime and date. These packages will be required for the upcoming functions in this view. Additionally, here you import Sum from django.db.models, as it will be needed for summing up the total kilowatt-hours and total cost.
Also, you will need to import the refresh_devices function from devices.views. It will be needed in order to refresh devices information and status every time the dashboard template is rendered.
Follows up the ‘dashboard’ function:
def dashboard(request):
    # Check the Cloud state of the devices
    refresh_devices(request)

    # Get all devices
    devices = Device.objects.filter(monitoring=True)

    # Devices count
    devices_count = devices.count()

    # Price per kWh
    price = Price.objects.last()

    # Get the Device Log
    device_log = DeviceLog.objects.all().order_by('-powered_off')

    # Sum total consumption in kWh
    total_kwh = DeviceLog.objects.aggregate(Sum('consumption'))['consumption__sum']

    # Sum total cost
    total_cost = DeviceLog.objects.aggregate(Sum('cost'))['cost__sum']

    context = {
        'devices': devices,
        'device_log': device_log,
        'devices_count': devices_count,
        'price': price,
        'total_kwh': total_kwh,
        'total_cost': total_cost
    }

    return render(request, 'dashboard.html', context)
In this function, all devices set for monitoring, total number of monitored devices, price per kilowatt-hour and the fields from DeviceLog model are fetched from the database and put into context. Based on the DeviceLog columns ‘consumption’ and ‘cost’, the total sum of each column is calculated and put into context as well.
Final words
You managed to read to this line. You are awesome! Thank you for staying with me this far in the article!
I had real fun with this small project. Plus, now my home is a bit more automated; now I have more control over my appliances and this project will give me more detail and a clearer picture of the cost of electricity used for my entire apartment.
If that time comes, I hope that you will have fun using this project as a base in some of your future home automation projects, and improve it with even more features. If you ever decide to do that, it would be great if you let me know.
As parting words, don’t forget to check out the entire code at my Github repository
Also, after all this writing, it would be ungrateful if I don’t give a big shout-out to Tuya. This project wouldn’t be possible without the option to connect my devices through Tuya IoT Platform Cloud and their greatly organized documentation for their APIs.
Well… I guess that's it. Thank you for being here!
If you liked this post, please consider subscribing to my mailing list - That will be a great supportive move and you won't miss any post in the future. Plus, you will occasionally receive exclusive, subscriber-only content: Behind the scenes information on upcoming projects, discounts, art, development, ui/ux tips & tricks. No spam, no BS.
To subscribe please visit my TinyLetter profile.